Tips for Photographing Small Birds
In this article, we’ll share our tips for photographing small birds with your digital camera and telephoto lens. This type of wildlife photography can be both challenging and rewarding.
Small birds, which often include songbirds, are a highly desirable species to photograph due to their striking colors and boisterous songs. It also means that, due to their size, they can be difficult to shoot so having the right equipment and settings can help enhance your image.
Small songbirds are our absolute favorite type of wildlife to photograph, and we have some useful techniques and tips to share on the subject. If you are willing to put in the work, capturing a sharp close-up of a small bird is very rewarding.
Capturing a frame-filling shot of a beautiful warbler is a truly amazing experience, and we want to help you accomplish this feat.

To successfully photograph small birds, you need to approach the task with suitable camera equipment, and specific camera settings that allow you to snap an extremely fast exposure.
The Right Camera Equipment
The camera you use, and more importantly, the camera lens you use, are crucial in being able to capture a close up shot of a small bird. A 400mm telephoto lens is often referred to as the bare minimum focal length for impressive bird photography images.
You may want to consider using a teleconverter to increase the magnification of your lens, but be aware that this will stop-down the f-ratio of your lens. This can be problematic when shooting in low-light situations, where you need every last bit of light-gathering power.
Any experienced wildlife photographer will tell you that when it comes to photographing small birds, the focal ratio of your lens is just as important as the focal length. A fast camera lens (F/4 or below) means that you can collect more light in a single shot.

As you speed up the shutter speed of your shots, the image becomes darker and darker. A lens with a fast f-ratio gives you much more control over the situation because you use a faster shutter speed that still allows enough light to reach the sensor for a well-exposed shot.
You may have heard the term, frames per second. This refers to the speed at which a camera can capture photos and can really make a difference in capturing a perfectly timed shot.
As technology continues to evolve, the frame rate for modern DSLR cameras continues to increase, but for comparison, our Canon EOS 7D Mk II shoots at 10 frames per second continuous shooting. A camera that is capable of shooting higher frames per second will provide more opportunity to get a shot of a small bird.

Perhaps more important than frames per second is the speed of focus for your camera (and lens). Newer cameras have options to set several focus points (65 focus points is not uncommon) for quick focusing capabilities. The Sony a7III has over 600 phase-detection focus points.
If you are having trouble keeping a fast-moving, small bird in focus, try using the AI Servo AF mode on your camera. This mode was specifically designed for moving subjects, and we have found it to be a lifesaver in many bird photography scenarios. It prioritizes moving subjects and predicts future movement. When you get this setting dialed in, you’ll wonder how you ever lived without it!
This can be especially helpful when tracking a fast-moving small bird, allowing you to refocus on your subject for a quick shot, and will work in tandem with your continuous shooting mode and frames per second.
Which Camera Lens to Use
Lenses vary a great deal in focal length, f numbers, and price. When looking at lenses for bird photography, specifically smaller songbirds, you will need an appropriate reach (or focal length) in order to keep an appropriate distance between you and your subject while still getting a close shot.
You may get lucky with a 200mm lens for bird photography, but capturing an up-close shot of a small bird at this range will be very difficult. The only way to get a clean shot at this focal length is for the bird to land extremely close to you (Less than 5 feet!). A prime telephoto lens of 300mm or more is recommended.
For us, mobility is the most important factor when birding and we would prefer to freehand shoot rather than being restricted to using tri or monopods. This means that 400mm is a great focal length to be able to maintain that freedom but still have a decent reach for bird photography.

We have found the Canon EF 400mm F/5.6L to be a fantastic lens for wildlife photography. It is not very heavy, which means you won’t get tired of carrying it around for a full day of birding. This lens is especially effective at capturing birds in flight.
Recommended Camera Settings
Since smaller birds generally move faster and more frequently than larger birds, the right camera settings and shutter speeds are important. Shutter speed affects the brightness of the photo but also the ability to capture action shots.
High shutter speeds of 1/1000 and above will freeze the bird in action, while birds in flight, and other fast action scenes, will require even faster shutter speeds. If your shutter speed is too slow, your bird will appear blurry in the photo.

For other small birds that are less active, slower shutter speeds of 1/250 – 1/800 will be enough to get a clear shot. You can also use this opportunity to use a lower ISO setting for better image quality, as higher ISOs contribute to higher noise. For even better image quality, a tripod or a monopod can also be used for slower shutter speeds.
Overview of the Best Camera Settings:
- Manual Mode (for full control)
- RAW image format (for better post-processing)
- Image Stabilization On (if available)
- Shutter speed of 1/1000 or faster (to freeze the action)
- ISO 100-800 (lower is better)
- Maximum aperture of your lens (F/4 or lower is best)
- AI Servo AF mode (in most situations)
Locating Small Birds
Smaller birds can be harder to notice or identify, as many songbirds prefer wooded areas. Slowing your walking pace and searching in amongst the trees for movement or bird calls can help you locate these smaller birds.
We would also highly suggest a pair of binoculars, to assist in looking for movement and to help identify your findings, even if there isn’t the best opportunity for a shot. This is also a good time to check your settings to make sure that they are appropriate for your lighting conditions, so when you do find something, you are ready.
Even while looking for birds, we also tend to focus on the side that has better lighting and position ourselves with our backs towards the sun for when we do find a bird. This does not mean we ignore the other side, as birds move from one side to the other, but it helps position us better if a bird happens to land in front of us.
If you find yourself with the sun to the far left or right that is okay too but having it behind you will give you the best light.

What are the Smallest Birds in the World?
Hummingbirds are the smallest birds in the world, with over 20 species found in North America. The Ruby-throated hummingbird is eastern North America’s sole breeding hummingbird, and the only species of hummingbird we can observe in our backyard in Canada. However, when traveling to other parts of the world, we see many new and exciting hummingbird species.
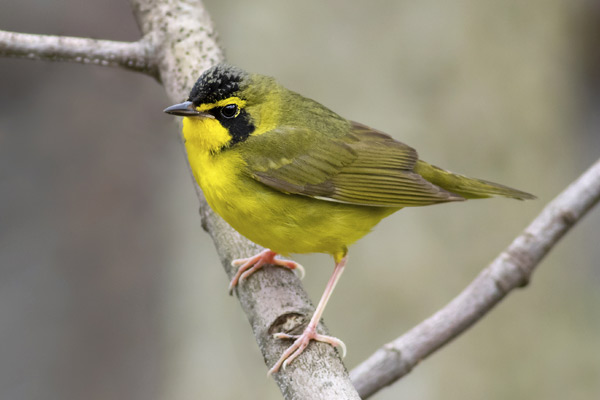
Wren’s, Kinglets, and Finches are also very small, making them that much more difficult to spot and photograph. Along with warblers, a few more local species come to mind in this category such as the Blue-gray Gnatcatcher and Black-capped Chickadee.
Here are some of the smallest birds in the world. You can view a complete list here.
- Pine Siskin
- Ruby-crowned Kinglet
- Winter Wren
- Orange-crowned Warbler
- Townsend’s Warbler
- Anna’s Hummingbird
- Allen’s Hummingbird
- Larence’s Goldfinch
- Ruby-throated Hummingbird
- Bank Swallow
- Blackburnian Warbler
- Northern Parula
- Magnolia Warbler
- Yellow Warbler
- Blue-gray Gnatcatcher
- Red-breasted Nuthatch
- Nelson’s Sparrow
- Philadelphia Vireo
- Golden-crowned Kinglet
- House Wren
- Black-capped Chickadee
- Bananaquit
- Common Waxbill
Approaching Birds
At this stage, it is important to be patient, approach slowly and wait for the bird to act naturally. All birds have their own comfort level in terms of how close they will let you get to them and approaching a bird too aggressively will cause them to fly away.
Below, are some techniques that we use:
If walking quickly on a trail and you spot a bird to photograph, start to progressively slow your pace. This may mean walking only a few steps a minute.
Avoid walking directly at the bird and try and walk when the bird is not looking at you.
Avoid sudden movements, including raising your camera to get a shot. Avoid being noisy, which can be hard if you aren’t on a man-made path. Again, do it slowly.

Photographing Small Birds
Once you have found a bird, your settings are set and can start to shoot. We suggest taking a test shot and looking at your screen to make sure it is not too dark or blurry, meaning that you don’t need to increase your ISO or shutter speeds. This will ensure that you don’t end up with several disappointing photos that are not usable.
Your background can be hard to control, but try to optimize situations or certain angles to produce the cleanest and most colorful background. There should be a good distance between you and the bird for a better depth of field (background blur).

Focus on the eye of the bird closest to you as the viewer. For your photo, it is acceptable to have other parts of the bird blurred, but one eye always needs to be in focus and sharp.
Again, take several images after your initial test shot. Increasing your speed, or using high continuous shooting, will be helpful to capture the subtle movements of the bird and increase your chances of getting a great shot. View our other posts for what to look for when shooting a bird, to decrease the number of photos that are deleted after a day of shooting.

Early morning and late afternoon provide the most optimal lighting conditions. Since birds are most active in the mornings, this is a great time to get out there and shoot.
Best of all, get out there and enjoy the journey.
In my personal experiences I have a 300 2.8 with a 2x teleconverter. I find that I can get close enough for good shots of small birds. Although you need to get into position, and then wait for the birds to come back after I’ve been there for a little while. I have a blind, although where I photograph the small birds is a public nature center, so using the blind wouldn’t work that well because of other people on the trail, You just have to find the best day and time when people are scarce.